Don't forget to read the previous article, namely> Beginner Programming Guide.
In this tutorial, we will discuss How to Create a Sharing Folder in Windows 7. If you have shared folders on Windows XP, you will easily share folders, but if you are using Windows 7 or Windows 8, 10, there will be a few problems. where security on Windows 7 is better than Windows XP. but take it easy you need to do 1 one step and it's not complicated ... Hehhehehe ...
Oh yes, for those of you who don't know what folder sharing is, we will explain it beforehand. One of the advantages of computer networks is that we can share folders, where these folders are free to use to fill in anything that will be used by several users in the network. The benefit is that we can access the data in the folder without having it on the user's computer. Folders are placed on the PC server, then many users can access them. Imagine if in an office there are 10 floors and each floor there are several users, one of the users on the 10th floor will send data to the user on the 1st floor. Then the user on the 10th floor doesn't have to go down to the 1st floor to provide data, just send it. to the Share Folder on the server, then User 1 can open or retrieve it in the Share Folder. How very useful is not it ????
Well, in the following we will provide knowledge to you how to create a share folder in Windows 7.
Prepare 2 computers (1 as Client, and 1 as Server)
Computer 1:
IP Address: 192.168.1.2
Subnet Mask: 255.255.255.0
Computer 2:
IP Address: 192.168.1.3
Subnet Mask: 255.255.255.0
Both computers must be connected to a network (you can use Peer to Peer or connect with a Switch)
If computer 1 and computer 2 are already connected, create a folder on drive D: on computer 1.
Folder Name: Share Folder
Right Click - Properties
Click ShareThen look for Everyone, then click Add
Then Click Share.
Finally, click Done
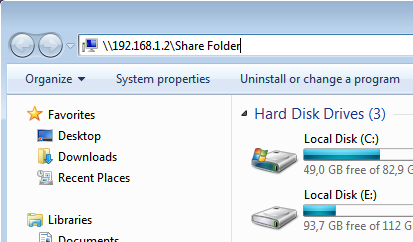
If so, to be able to access it you use computer 2, because computer 1 is used as a server.
Open your computer

Click \\ 192.168.1.2 \ Share Folder
Click ENTER
If so, then there you can access and you can enter the required data.
This is the step by step in Creating a Sharing Folder in Windows 7. Hopefully it will benefit you.
Apart from being a programming information medium, we also share articles related to Android trick tips.


0 Response to "How to Create a Sharing Folder in Windows 7"
Post a Comment